

Since 1975, General Motors has addressed
the needs for efficient combustion with its High-Energy Ignition (HEI) system.
These HEI systems fire a considerably "hotter" (increased voltage) and
"fatter" (higher amperage) spark across the spark plug electrodes.
The greater power at the spark plug gap consistently ionizes the air across plug
gaps of .045 to .060 inches. The most notable results of upgrading your stock
Jeep to GM HEI include:
- Increased horsepower & torque
- Improved acceleration & idle
- Decreased fuel consumption & emissions
Computer controlled 258 owners with the electronic Carter BBD carberator click here.
GM HEI Distributor = $30-$60
Purchase your HEI from a salvage yard. A
remanufactured unit from your local auto parts chain will cost you well over
$100. Start the search for an HEI from vehicles of the years 78-82 with
the GM 250 or 292 I6 engine. These distributors were most common in the Chevy
Nova, vans and trucks. You will be looking for the HEI with the coil built
into the cap. The proper HEI will already have 3 wires coming from the
distributor body and plug into the coil on top of the cap.
New distributor drive gear = $25
The drive gear used on the HEI is cut in the
reverse direction as those used on Jeep distributors and must be replaced.
Pre-78 Jeep owners with the Prestolite ignition can use their stock Jeep
gear to replace the one on the HEI distributor. The drive gear found on stock
79 & later Jeeps with the Duraspark ignition will not fit properly on the
HEI distributor. This problem is easily remedied with the purchase of a new
drive gear. The part number is 3208615. Use this part number at a Chrysler
dealer (and pay a lot of money) or better yet, order it from Four
Wheel Drive Hardware or Savanna
Jones This is the gear found on 83 and later AMC V8 engines and will fit
perfectly on the HEI's distributor shaft.
Replacement Spark Plug wires = $25
The GM HEI requires different style spark
plug wires than those used on a stock Jeep ignition. I used plug wires from a
77-83 Ford Fairmont with a 200 inline 6. They were a little long but are the
closest match found so far. You have the option of buying the types of plug
wires you cut to size. This will ensure you don't have wires that are too short
or so long that they lean up against a heat source. Buy quality wires. Another
option would be to buy wires for an 8cyl. This way you will get two extra wires
at the same cost.
Misc. wire and connectors, vacuum line =
$5-$10
A few feet of 12 or 14 gauge ignition wire
and some 12 or 14 gauge female spade connectors will be used. A longer length of
the proper vacuum hose may be needed for the HEI's vacuum advance mechanism.
The stock hose on mine was an inch or two short after installing the HEI.
Centech
Wiring sells these HEI style connectors ($4.25) if you want 'factory'
style wiring. The quality of their products is top of the line. They also supply
complete wiring harnesses and power steering components as well as other Jeep
related products. Check em out some time.
Replacement Rotor & Cap = $25
It is a good idea to replace these items on a
salvaged HEI unit. Buy a quality set! Blue Streak is generally regarded as the
best and is highly recommended.
Optional: Adjustable Vacuum Advance =
$20
The factory vacuum advance setting on most
HEI distributors is too high. An adjustable vacuum advance unit can be used if
you experience 'pinging' or poor fuel economy. Crane Cams makes an excellent kit
and is available through Summit Racing
or most speed shops.
Note: There are mini rebuild/recurve
kits available for the HEI distributor. These can be found at most local auto
parts retailers or Summit Racing.
Thoroughly examine and clean the HEI distributor. Remove the original rotor and check the spring posts. They should not be dished by wear. Check the mechanical advance weights and make sure they move freely. Carb cleaner can be used to loosen any lightly rusted areas and will work great to clean up the components. Apply a few drops of a light oil to the moving parts. Make sure to wipe up as much excess oil as possible to keep from attracting dirt. A wire brush can be used to remove any grease or buildup found on the distributor's stem & body. Replace the old rotor with a new one. Replace the drive gear on the HEI. I suggest putting the old cap on the distributor to protect the inner components of the HEI during the gear removal process. Use a hammer & punch to drive the pin out of the drive gear and stem of the distributor. The old gear can now be removed and the new gear & pin installed. Remove the old cap.
Note: Those with pre-79 258's may need to grind or file the part of the HEI distributor shaft that drives the oil pump. This may be needed to get the HEI distributor to seat properly in the engine block. Check the fit and if needed file or grind the HEI stem until it closely matches the stock stem. It shouldn't require much if anything at all.
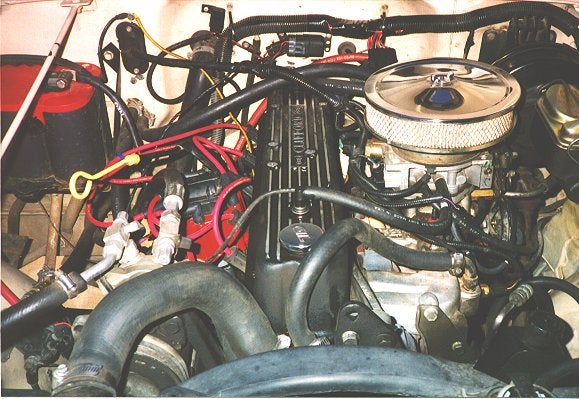
Disconnect the battery. Unplug the wiring from the stock distributor, coil and the stock ignition module (found under the windshield washer fluid reservoir on the driver's side fender well). Remove the old coil from the jeep. The large size of the HEI distributor blocks access to the stock coil's mounting bracket. You will not be able to remove it once the HEI is installed.
Finding 0? TDC on the compression
stroke:
Remove your spark plugs after taking note of
which post on the stock distributor cap is the # 1 terminal. Place a wine cork
(or the finger of a second person) in the #1 spark plug hole. Don't force the
cork into the hole, we want it to be able to come out when the piston
compresses. Place a (3/4"?) wrench or socket on the vibration damper's
bolt, rotate clockwise until the wine cork pops out so you now know this is the
compression stroke. Note: Always rotate the engine in a
"clockwise" direction as you look at the vibration damper. Continue
turning until the timing mark shows 0? TDC. Make sure you have not made a
complete 360? turn. If you did, this will be the exhaust stroke and you will
need to start over.
Installing the HEI:
Carefully remove the stock distributor cap
and mark the position of the rotor. It should be pointing to the # 1 spark plug
terminal. Mark the body of the distributor with the engine block for reference.
Lift the stock distributor straight out. If you have a tough time getting it
out, lightly tap the base of the distributor with a hammer to loosen it.
Take the newly assembled HEI and estimate
the position you would like it installed in. You determine where you want the #1
plug terminal to be. By having the engine at 0? TDC whatever terminal the rotor
points to will be #1. The stem on the HEI is what drives the oil pump. Take a
long flathead screwdriver and inside of the engine block you can turn the oil
pump slot so that it is going to line up with the stem on the distributor. If we
put the HEI in the Jeep as is, the rotor will rotate clockwise due to the
directional teeth on the drive gear and in turn will be one tooth off. To
compensate for this, turn the rotor one tooth counter-clockwise before
installing in the jeep. Now you can install the distributor body in any
position you want, as long as the rotor points to a spark plug wire terminal on
the cap. You may need to play with the position of the distributor if you have
any clearance problems or if you want to position the vacuum advance unit away
from the front of the vehicle. I had a minor clearance problem between the HEI
cap and the engine block that was remedied by slightly rotating the distributor
body. I also had to bend my dipstick (be careful if you do this) to allow the
new distributor to fit. Standing in front of the jeep and looking towards the
rear, my advance points to 8 o'clock and my # 1 plug terminal points to 6
o'clock. With the distributor properly seated the rotor should now
be perfectly lined up with a spark plug wire terminal on the distributor cap.
This terminal is now #1. Do not force the HEI into position. It should seat
rather smoothly. If you experience problems then you do not have the oil pump
shaft lined up or you may not be seating the drive gear properly. Note:
Most HEI distributors have a notch on the body that will align with an exact
position on the distributor cap... in short, there is only one position the cap
can properly seat on the distributor body. Tighten down the distributor hold
down clamp once you have the new HEI installed.
Note: Remember to mark the plug wire
positioning on the new cap... often they are marked from the factory... by
rotating the distributor and using a position not factory, it could get
very confusing, especially if you take the Jeep to another mechanic who spends
some time thinking position 5 is position 1... and then tears apart your timing
case to ?cure? the problem!
Spark plugs & spark plug wires:
Re-gap your spark plugs to .045".
Install the new spark plug wires in the proper order.
Wiring the HEI:
This is essentially a one wire hookup. The
HEI distributor has two marked terminals. One is a power source and the other is
for a tach signal. simple
wiring diagram
HEI distributors require 12 volts during the ignition 'crank' and ?run' positions. I used the 12-gauge red wire that fed power to my old Durapsark ignition module. If you choose this method you must make sure you use the wire that enters the ignition module and not the wire that exits. The exiting wire has resistance somewhere along the line and supplies the required 12 volts during the 'crank' position but only 9.6(?) volts during the 'run' position. Because everyone has different vehicles you may not have the same wire I used. A few other options for supplying the proper voltage:
1. Use the positive wire from the stock Jeep coil to trigger a 12 volt 30 amp relay. Relays are inexpensive and available at most automotive parts retailers. Wiring diagrams are included with the relays and installation is simple.
2. Run a new wire from a position in the fuse block that gets the proper voltage during the proper ignition positions.
Make sure you don't supply the new distributor with a constant 12 volts. You may have an interesting time shutting off your engine once you start it or you will eventually drain your battery.
Those with factory tachometers are
probably done with the wiring. My factory tach works fine even though it is not
hooked up to the HEI. If you have an aftermarket tach or if you are no longer
getting a signal from your existing unit then simply use the 'tach' terminal on
the HEI.
Note: It is important to me that everyone understands this swap is as permanent as you would like it be. You can easily turn back at any time and return to the stock ignition setup if necessary. It is also a good idea to carry around the stock jeep ignition components as a backup.
Replace or reinstall the vacuum hose to the HEI's vacuum advance. Use the stock port from the carb.
Timing:
Start the engine and set your timing. Mine is
now set at 9 BTDC at 1600 rpm's. Follow the specifications of your model
and year. Then make fine adjustments if necessary.