|
When
to do it? Hopefully before it seizes!
|
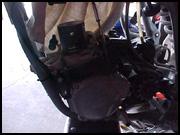
Lucky for me I pulled in the clutch in time and prevented a full seizure. I was able to start and ride the bike back to camp. At first I thought maybe my buddy was right about the rear brake thing, but then I knew I couldn't have done such a stupid thing. After getting home I decided to take the top-end off and take a look. Sure enough the bike had started to seize up pretty good. My piston was shot, even worse the Nikasil on my cylinder was also chipped.
 |
I started looking into prices and options for the rebuild. You have a few choices in doing a rebuild like this. One option is to order the new piston and then ship your piston and cylinder off to get it replated at one of the reputable shops. The negative to this is that there is often a wait of 2-6 weeks to get your stuff back. Since I had a ride coming up in two weeks I didn't have the time to chance not getting my stuff back in time. Onto the next option...
 |
I received a tip from someone on a KTM 300 list that KTM sells refurbished cylinders on exchange as a service to their customers. An email to Holeshot Racing in Ohio confirmed this and I had my cylinder, minus the face plate, shipped off the next day. Once Holeshot confirmed my cylinder was refurbishable they shipped an already refurbished cylinder right back to me. This method is more expensive, but the turn-around time is really quick. Another positive is that the since factory KTM cylinders come in #1 and #2 sizes I could make sure I had the right size piston for the cylinder.
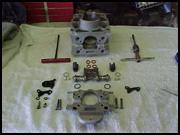
After I received the cylinder and confirmed it was a #1 I went to my local shop, Z-Racing in Anaheim CA, and picked up a #1 piston kit and all necessary gaskets and other parts. They advised me of a couple of tips for rebuilding. The first was to lightly sand your power-valve side-covers on a flat surface. As the covers heat up they can warp a little and lead to future leaks with the new gaskets. By giving the covers a light sanding you can reduce the likelihood of any leaking.
 |
The second tip was not to remove the power-valve set screw if you don't need to adjust the power-valve clearance. This is a very good tip if you are just replacing the piston and rings and not having any cylinder work done. Since I was using a different cylinder I opted to remove the set screw and double-check the clearance upon reassembly. The sound of a new piston hitting the power-valve would not be very welcomed after spending so much time and money on this rebuild.
The first step in assembling the engine was cleaning up the cylinder. Running a tap through the threads on the bolt-holes gets rid of all the paint and stuff that accumulates from the refurbishing process. After this a quick wash with hot soapy water and dry with compressed air will get rid of any junk sitting in the ports or holes. The cylinder is now ready for reassembly.
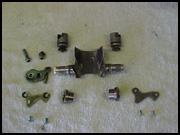 |
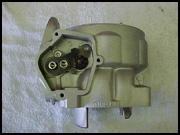
Next step was to install the cleaned up power-valve and parts. New o-rings were installed on the power-valve shafts and the front power-valve cylinder cover. I also used some hi-temp RTV silicone for the cylinder cover around the o-rings to prevent any coolant from seeping by. Not sure if this is a necessity but another friend who didn't do this on his rebuild ended up with leaks in this area and had to take everything back apart.
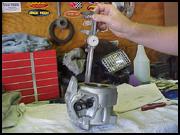 |
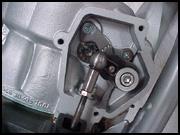
With the power-valve installed in the cylinder it was time to set the power-valve to piston clearance. Sine this measurement varies by model consult the shop manual for your model. KTM refers to this measurement as Dimension Z, and it is measured from the top edge of the cylinder to the bottom edge of the closed power-valve. Using dial calipers I set the clearance for my model and then tightened up the set screw. A quick second measurement is a good idea to ensure the clearance remains the same after tightening the set-screw.
 |
After installing the rings on the piston, and the piston on the connecting rod, it was time to put on a new base gasket and lower the cylinder in place. Here you need to make sure end of piston rings remain up against the stop pins on the piston. Each ring has the stop pin in a different location to prevent the blowby of the air/fuel mixture. Once you get the cylinder in place and the base nuts hand tight KTM wants you to measure the distance from the top-edge of the cylinder to the top of the piston at TDC (Top Dead Center). This is known as Dimension X and can be adjusted by using base-gaskets of different thickness' available from your dealer. In my case I used the stock thickness gasket and my measurement was within tolerance. Don't forget to torque the cylinder base nuts down after getting the Dimension X correct.
 |
Once the cylinder is in place re-attach the power-valve lever and install the power-valve gaskets and covers. Check to see that the piston isn't hitting the power-valve by cranking over the engine slowly with the kickstarter. Install new o-rings in the cylinder head and torque the head to the proper specs listed in your manual. Re-attach the radiator hoses and remaining parts you removed. Once you get everything installed and tightened up be sure to add coolant and bleed the air out of the cooling system.
If you did everything right then the engine should fire up after a few kicks. Break-in methods vary from person to person so ask around and pick one you like. After the rebuild my 300 had a noticeable increase in power and felt much more responsive. To keep things fresh it is a good idea to do a compression check every so often to make sure everything is still in good shape. Once you notice a decrease in compression beyond the limits listed in your manual you should replace the rings, and anything that is out of spec.
ET